최종프로젝트 환경설정
0.준비
반디집 설치
⇒pom.xml 들어있는 폴더 라서 빈디집 필요
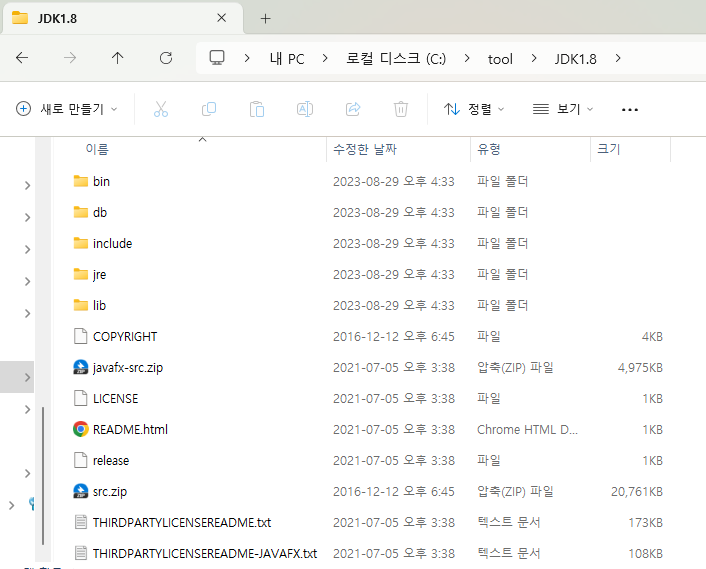
JDK1.8 설치 (맞는 버전으로 다운로드)
설치 방법
압축 풀기
환경 변경 설정하기
원도우> 시스템 환경 변수 편집 클릭

시스템 속성 > 환경 변수 클릭

시스템 변수 새로 만들기 클릭
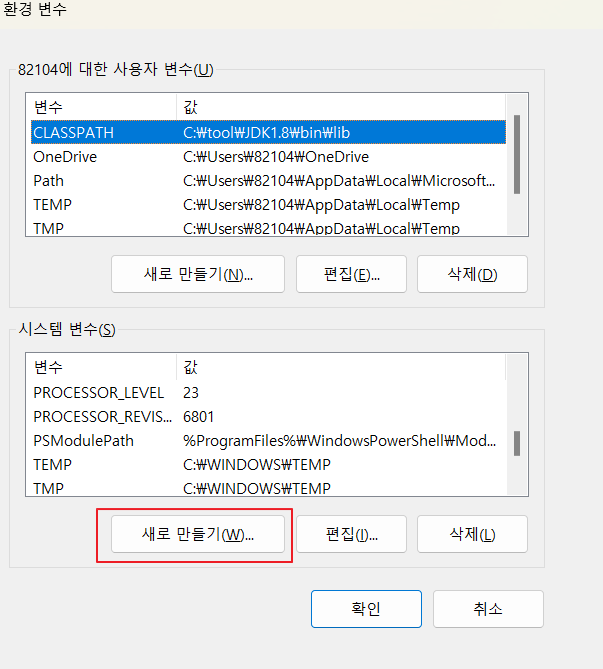
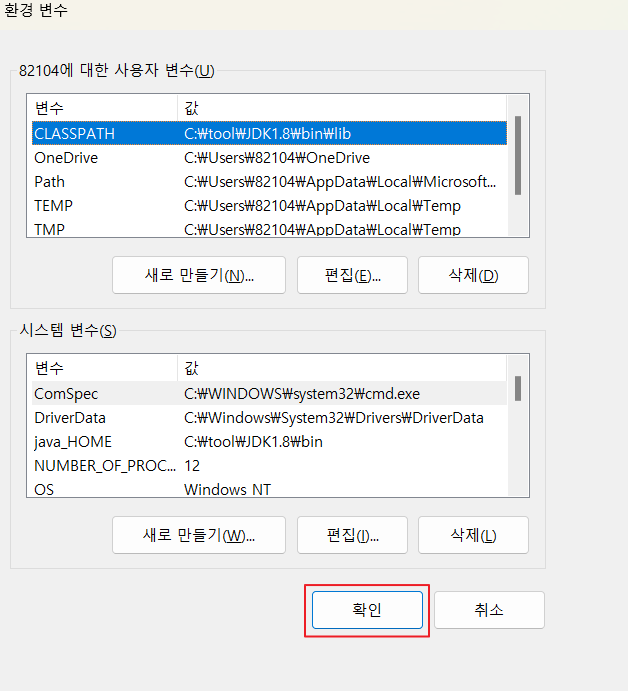
변수 이름 java_HOME, 변수값 JDK 설치 경로

JDK 설치 경로


시스템 변수 Path 더블 클릭

새로만들기 클릭 > jdk bin 설치 경로 입력 > 맨위로 이동 > 확인

확인 클릭
cmd 창 열어서 자바 버전 확인
java -versionjavac -version
tomcat9 버전 다운로드
프로젝트 설치
STS 3.9.15설치
https://github.com/spring-attic/toolsuite-distribution/wiki/Spring-Tool-Suite-3
Spring Tool Suite 3
the distribution build for the Spring Tool Suite and the Groovy/Grails Tool Suite - spring-attic/toolsuite-distribution
github.com

sts-bundle > sts-3.9.15.RELEASE 폴더 복사 > ddit 붙여넣기>sts3915 이름변경(접근성 높힐려고 변경)

ddit ⇒ sts3915 폴더, tomcat9 폴더 ,workspace 폴더(직접 생성)

워크스페이스 선택

SVN 설치
상단바 Window > Preferences

검색 install > Install/Update 클릭 > Verify ~ 체크 해제 > Apply > Apply and Close

svnconnectors_plusgin zip 폴더 풀기

sts3915폴더>plugins 폴더에서 jar 넣기

상단바 Help 클릭 > Eclipse Marketplace.. 클릭

svn 검색 > Subversive Install 클릭

Subversive 설치 후 설치 확인 방법
상단바 Window > Preferences > svn 검색 > SVN 클릭 > SVN Connector 에서 확인

주의사항!
Project Faces > Dynamic Web Module 4.0 변경!
spring 프로젝트 환경설정
0. 환경설정https://lavender1122.tistory.com/162 Help > About Eclipse IDE 2. Installation Details 3. Configuration 에서 launcher 에서 설치 경로 확" data-og-host="lavender1122.tistory.com" data-og-source-url="https://lavender1122.tistory.com/162
lavender1122.tistory.com